April 30, 2013

THE ELISE TEE WITH PATTERN

29 comments:
Elise tee with pattern

You may remember from my last sewing post that I was keen on wearing more woven tops. Well, scrap that because I just sewed up two of these tees and I already want to wear them everyday.

Elise tee with pattern

The Elise tee is not quite a tank and not quite a top. It does not have sleeves so it is sort of, kind of like a muscle tee with a deep feminine neckline. I love it because it shows just enough skin but still has enough coverage for a crisp Vancouver spring. It is 14 degrees out and I want to wear tank tops but this tee with a sweater will have to do.

Elise tee with pattern

To make this your own favourite tee of 2013 I highly suggest you seek out the lightest weight jersey you can find. The black version is made from a modal spandex jersey. The white is made from a sheer 100% tencel jersey. What a find! I'll have to go and grab some more, I love the way it sewed up.

I will definitely be making this top with a woven front variation. Silk, please!

Elise tee with pattern

For those with keen eyes you might notice the white version has shoulder seams further to the front. I added these because after cutting out the front I noticed a fabric flaw on the right shoulder. Grrr. So I shook my fist a little and then used my problem solving skills to re-cut some new shoulder panels.

By the way, I also have a pattern for these pink shorts but I wasn't sure if people would be interested in them. They are a lined short with front pleats and sideseam pockets. I made them here in fuchsia linen but they would also be great in silk. Frankly everything is great in silk. If anyone would like me to share the pattern please leave a comment. Digitizing and grading these puppies will take a little encouragement.

Thank goodily goodness I hammered out all that formatting on my first pattern. This one took 1/4 of the time!

Please download your Elise Pattern here!


Elise tee with pattern


Or visit my BurdaStyle profile here, where I am uploading patterns.

Note* I did not like any of the photos from this shoot where I made eye contact with the camera. Apparently I only liked photos where I look like I find the ground incredibly interesting and a little sad.

Happy sewing!

xoxo Melissa

April 29, 2013

SALTED CARAMEL CHOCOLATE CUPCAKES WITH PORT WINE MACARON

No comments:
Salted Caramel Chocolate Cupcake

Whew, that name is a mouthful. A delicious one!

One of my current favourite flavours is salted caramel. I know, I know, its been done to death but its sooo good!

Salted Caramel Chocolate Cupcake

These decadent chocolate cupcakes are filled with a homemade salted caramel sauce and topped with a salted caramel buttercream. Mmmm.

So, as you might suspect, caramel can be tricky. I burned two batches! That's four cups of sugar down the chute and a whole lot of pot scrubbing. I finally made a good batch by NOT trusting my thermometer but by trusting my eye. My sugar was burning within seconds of colouring and my candy thermometer was not reading the temperature fast enough. Therefore my recipe reflects this less technical yet much less burny approach.

Chocolate Macaron Edible Flowers

I knew I wanted to make a chocolate macaron for this chocolate cupcake and decided on a port wine ganache because 'A', google told me port was a good pairing for chocolate and caramel, and 'B', I had a bottle in the cupboard.

I really enjoyed planning out the decorations for all of the Paris-inspired cupcakes. Ensuring they would all have different yet complimentary colour stories and styles. For this cupcake I knew I wanted it to have a purple element to offset the rich chocolate brown. 

Edible Dried Petals

I love using these edible flower petals, they are gorgeous, rustic, imperfect and natural. They also impart a lovely floral scent. 

The petals I used are from Epicure Selections, unfortunately this product has been discontinued. I guess I will have to grow my own garden of edible flowers before this jar runs out. First step, obtain a house with a yard. In Vancouver? Oh dear.

The chocolate discs are a super easy and chic decoration. I actually used Candy Melts because I have not attempted the wizardry that is tempering chocolate. Candy Melts are a total cop-out but they honestly don't taste that bad. I only use them for small decorations and would never, ever use them in a recipe, like a ganache, cake or mousse. That would be sad.


To make the chocolate discs melt 10-15 Candy Melts in the microwave at 50% power for about 1 minute and stir to completely melt.


Spoon the melted Candy Melts into a small Ziploc bag, clip a very small hole at one tip and pipe small 1 cm mounds onto a strip of parchment paper.


Lay a second piece of parchment on top of the mounds. Use your finger to press down and spread out the chocolate into even circles. Set aside until hardened, about 20 minutes. Peel back your parchment to reveal your beautiful discs.

Chocolate Discs


For the gold dusting I simply brushed edible gold luster dust onto the discs with a dry paint brush. Easy peasy. It will be extremely helpful if you have a kitchen-specific set of tweezers to pick up the chocolate discs because you will find your fingers may melt these delicate decorations before they reach your cupcake.

Port Wine Chocolate Macaron
Chocolate macaron recipe adapted from Mad about Macarons!

Yield: 60 mini macaron or 40 medium macaron

Notes*

You will need a digital kitchen scale to make this recipe. They can be found very reasonably, I picked mine up for a whopping $10. I highly suggest the investment, it will open up a whole new world of recipes.

Age your egg whites by sealing the bowl containing your separated egg whites with plastic wrap and punching a few holes for ventilation. Refrigerate for at least 24 hours or up to 7 days.

Ingredients:

For the Chocolate Macaron
  • 150 g egg whites, aged, at room temperature
  • 100 g superfine sugar (caster, berry)
  • 180 g ground almonds
  • 270 g icing sugar (confectioners', powdered)
  • 10 g unsweetened dark cocoa powder (callebaut, guittard, cocoa barry)
  • Edible dried petals (optional)


For the Port Wine Ganache
  • 1/4 cup heavy whipping cream
  • 1 teaspoons white corn syrup
  • 3 tablespoons port wine
  • 4 1/2 ounces dark chocolate, finely chopped
  • Red gel food colouring (optional)


Instructions:

For the Macaron

1. With paper towel wipe down your mixer bowl and whisk attachment with lemon juice or vinegar to remove any trace of fat, oil or soap. Rinse with water and dry.

2. Line two baking sheets with perfectly flat parchment paper or silicone baking mats if you have them.

3. Place the ground almonds and icing sugar into a food processor and pulse on and off for 30 seconds to incorporate and reduce any large pieces of almond.

4. In a large bowl sift the icing sugar, ground almonds and cocoa powder three times or more if your arm is strong enough. Discard any large coarse pieces of ground almonds. If there are a lot of pieces to discard weigh them and replace with more ground almonds. Or alternatively you can grind the coarse almonds in a spice/coffee grinder until they can be sifted. 

3. Whisk egg whites (at room temperature) in stand mixer until soft peaks form. While the mixer is running at medium-high speed ("6" on a KitchenAid) sprinkle in sugar a tablespoon at a time. Scrape down sides of bowl to fully incorporate.

4. Whisk on high ("8" on a KitchenAid) until you mixture turns glossy and reaches stiff peak stage.

5. Combine 1/2 of the dry mixture into the egg white mixture. Mix well, there is no need to carefully fold the mixture at this point.

6. Add second 1/2 of the dry ingredients to the bowl and begin your macronnage. Scrape the bottom of the bowl, turn the batter upside down and plop it on the top. Alternate this technique with swiping the batter against the side of the bowl several times and then scraping the side of the bowl and plopping the batter on top. The best way to tell when your batter is ready is by scooping a spoonful of batter and letting it drop back into the bowl. If it slowly drops back into the bowl, lands on the batter in a small mound and slowly sinks back into the batter, then you are done.

7. Transfer the mixture to a piping bag with a plain tip. An 804 (1 cm opening) pastry tip will work best but a plain tip size 10 or higher can also be used. Ensure you turn down the top cuff of the bag before filling. This will make the process of filling the bag a lot less messy.

8. On tray, pipe out 2 cm rounds of batter to make mini macaron. For medium macarons pipe to 3 cm in diameter. Leave 4 cm between piped rounds. Lay a dishcloth on your counter and rap the tray firmly against the counter top a few times. Don't be afraid to really give them a BANG! This will help the macaron's peaks sink in. You may need to rap the tray in between piping rows because the macaron can set within a minute. To decorate place dried flower petals onto 30 or half of the piped rounds. 

9. Leave trays out at room temperature for 30 minutes to an hour. This will help the feet (pieds) to form.

10. While the macaron are setting, preheat your oven to 300° F (150° C). Reduce the temperature to 250° F (120° C) and bake your macaron in the center of the oven, one tray at a time, for about 15 - 20 minutes. Test after 12 minutes. If you touch the top of the macaron and there is a wobble continue baking for 5 - 6 minutes longer until firm. Remove from oven and let cool on trays.

11. Marry up the shells in similar sized pairs, one with petals and one with out. Fill a piping bag or Ziploc bag with the Port Wine Ganache and pipe a small amount into the center of one shell. Place its partner on top, using a circular motion to gently squish filling to but not over the edges of the macaron.


For the Port Wine Ganache

1. Place finely chopped chocolate into a small bowl.

1. In a small pot, bring cream and corn syrup to a simmer over medium heat, stirring with a spatula.

2. Remove cream from heat, add a small amount of red gel food colouring and mix.

3. Pour cream mixture over chopped chocolate and let sit for 1 minute. Mix until melted. Add port wine and mix. Let cool at room temperature and store in refrigerator up to 2 weeks.

Chocolate Salted Caramel Cupcakes
Cake recipe adapted from Sweetapolita
Salted Caramel Sauce recipe adapted from Simply Recipes
Salted Caramel Buttercream recipe adapted from Two Peas and Their Pod

Yield: 20-24 cupcake or one 2 layer, 8" round cake


Notes*

You will have about 1/2 cup of salted caramel sauce leftover but I am sure you can solve this dilemma.

Ingredients:

For the Chocolate Cake
  • 1-1/2 cups all-purpose flour
  • 1-1/2 cups sugar
  • 1/2 cup unsweetened dark cocoa powder (callebaut, guittard, cocoa barry)
  • 1-1/2 teaspoons baking soda
  • 1-1/2 teaspoons baking powder
  • 1-1/2 teaspoons cornstarch
  • 1 teaspoon salt
  • 2/3 cup buttermilk
  • 1/2 cup brewed coffee or espresso, warm
  • 1/3 cup + 1 tablespoon vegetable oil
  • 2 eggs, room temperature, lightly beaten
  • 1 tablespoon pure vanilla extract
For the Salted Caramel Sauce
  • 2 cups sugar
  • 3/4 cup unsalted butter, room temperature, cut into cubes
  • 1 cup heavy whipping cream, room temperature
  • 2 teaspoons pure vanilla extract
  • 1 tablespoon fleur de sel or Maldon sea salt flakes
For the Salted Caramel Buttercream
  • 1 cup + 2 tablespoons unsalted butter, room temperature, cut into cubes
  • 3 cups icing sugar (confectioners', powdered)
  • 3/4 cup salted caramel sauce
Instructions:

For the Chocolate Cake

1. Preheat oven to 350° F (180° C). Line muffin pan with cupcake liners.

3. In a 2 cup measuring cup or medium bowl, combine the buttermilk, coffee, oil, egg and vanilla and whisk to combine.

2. In the bowl of an electric mixer sift the flour, sugar, cocoa powder, baking soda, baking powder, cornstarch and salt. Using the paddle attachment mix on low for 30 seconds.

4. Add the liquid mixture to the dry ingredients and mix for 2 minutes on medium speed. The batter will be very liquidy.

5. Divide the batter evenly among liners. Batter will reach 2/3 full or just less but do not fear, this batter rises a lot, you will have perfect flat-topped cupcakes. Bake for 15-17 minutes until tops feel stable or until a cake tester comes out clean when inserted into the center. Ensure to not over bake these delicate cakes! Immediately remove cupcakes from muffin pan to cool on racks and let cool completely.

6. Time to fill your cupcake! Using a small pairing knife cut a 3 cm cone out of the top of the cupcake. You want your cone to be fairly deep but not through the bottom of the cake! Fill your cupcake with 1 teaspoon of Salted Caramel Sauce. Cut the bottom tip off the cupcake cone and replace the top of the cupcake.

7. Frost with Salted Caramel Buttercream using desired tip and decorate with your Port Wine Macaron, chocolate disc and 3 Callebaut CrispearlsCover and store at room temperature for up to 2 days or in the refrigerator up to 5 days (eaten at room temperature). Best eaten the same day as baked.

For the Salted Caramel Sauce

1. Ensure you have all of your ingredients in place. Making caramel is a fast process so have your butter and cream ready to go by the stove. And be careful!

2. Heat the sugar over medium-high heat in a heavy bottom 2-quart or 3-quart saucepan. Continuously stir the sugar as it begins to melt with a wooden spoon or whisk. As soon as the sugar comes to a boil stop stirring. You can swirl the pan to distribute the heat from this point on. Watch for your sugar to turn an amber colour, this can take from 10 seconds to 1 minute depending on the heaviness of your pan.

3. Once the amber colour is reached immediately add the butter and whisk until melted.

4. Remove the pan from the heat and count to three, then very slowly add the cream and continue to whisk until incorporated. A note that when you add the butter and especially the cream the mixture will foam up vigorously, that is why you need to use a larger pan.

5. Add the salt and stir at least 1 minute to incorporate. Let cool 10 minutes and pour into a glass mason jar and let cool at room temperature. Store in the refrigerator for up to 2 weeks.


For the Salted Caramel Buttercream

1. In the bowl of an electric mixer fitted with the paddle attachment, whip butter for 6 minutes on medium speed. Butter will become fluffy and pale.

2. Add icing sugar and mix on low speed until combined, then on medium-high speed for 1 minute. Turn off mixer and add the salted caramel sauce. Beat on low until combined and beat another 3 minutes on medium high until frosting is light and creamy.

3. Best used right away.

Thanks so much for reading! Hope you enjoy these chocolate delights.

xoxo Melissa

April 23, 2013

VANILLA PISTACHIO CUPCAKES WITH ROSE WATER MACARON

1 comment:
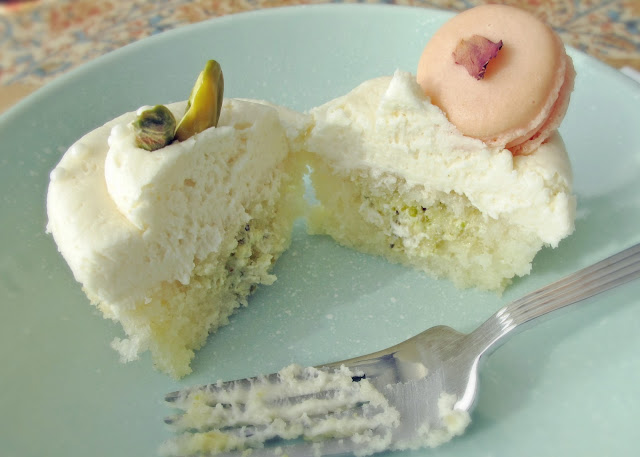
Vanilla Pistachio Cupcake

When deciding what trio of flavours I was going to make for the fundraising Paris-inspired cupcakes, I knew that a vanilla cake with vanilla buttercream was a people-pleasing must. Taking from French pastry inspiration I decided to fill it with a pistachio buttercream and then my interests in Moroccan and Algerian flavours led me to the pair it with a rose water macaron.

Vanilla Pistachio Cupcake

Rose water can be found in stores that carry Middle Eastern food products. This amazing flower essence infused water is imported from Lebanon. If you do pick some up I suggest you also buy the orange blossom water which will likely be on the same shelf.


Vanilla Pistachio Cupcake

The pistachio filling was made by mixing pistachio paste with my Fluffy Mom Frosting which is a vanilla buttercream. Pistachio paste can be purchased but it is expensive and hard to find. It is used in quite a few french pastries including pistachio jaconde which is a sponge cake used in many entremet. Since I plan on tackling some entremet soon I decided to try and make the paste on my own.


Rose Water Macaron

There are already many amazing tutorials online for macarons. I've added links to two great french meringue macaron tutorials here and here. I recommend watching this video to understand the important technique of macronnage.

I definitely had my share of hiccups preparing the macarons but even thou the 'pieds' may be a little big or the tops may have coloured slightly, in the end they are all delicious!

I hope you enjoy these recipes and give them a try alone or together. Just remember to spread the recipes out over a couple of days starting with ageing the egg whites. The macarons will also benefit from a few days in the fridge to meld and intensify the flavours before topping your delightful cupcakes.


Rose Water Macaron
Basic macaron recipe adapted from Mad about Macarons!

Yield: 60 mini macaron or 40 medium macaron

Notes*
You will need a digital kitchen scale to make this recipe. They can be found very reasonably, I picked mine up for a whopping $10. I highly suggest the investment, it will open up a whole new world of recipes.

Age your egg whites by sealing the bowl containing your separated egg whites with plastic wrap and punching a few holes for ventilation. Refrigerate for at least 24 hours or up to 7 days.

Ingredients:

For the Basic Macaron
  • 150 g egg whites, aged, at room temperature
  • 100 g superfine sugar (caster, berry)
  • 180 g ground almonds
  • 270 g icing sugar (confectioners', powdered)
  • Gel food colour, pink and ivory
  • Edible dried rose petals (optional)
For the Rose Water Ganache
  • 1/2 cup heavy whipping cream
  • 2 teaspoons white corn syrup
  • 2 teaspoons rose water
  • 4 ounces white chocolate, finely chopped
  • 1 tablespoon butter
  • Gel food colour, pink and ivory
Instructions:

For the Basic Macaron

1. With paper towel wipe down your mixer bowl and whisk attachment with lemon juice or vinegar to remove any trace of fat, oil or soap. Rinse with water and dry.

2. Line two baking sheets with perfectly flat parchment paper or silicone baking mats if you have them.

3. Place the ground almonds and icing sugar into a food processor and pulse on and off for 30 seconds to incorporate and reduce any large pieces of almond.

4. In a large bowl sift the icing sugar and almond mixture three times. Discard any large coarse pieces of ground almonds. If there are a lot of pieces to discard weigh them and replace with more ground almonds. Or alternatively you can grind the coarse almonds in a spice/coffee grinder until they can be sifted. 

3. Whisk egg whites (at room temperature) in stand mixer until soft peaks form. While the mixer is running at medium-high speed ("6" on a KitchenAid) sprinkle in sugar a tablespoon at a time. Scrape down sides of bowl to fully incorporate.

4. Whisk on high ("8" on a KitchenAid) until you mixture turns glossy and reaches stiff peak stage.

5. Add the food colour to the meringue, 3 parts pink to 1 part ivory. Continue whisking on high about 30 seconds, scrapping sides as necessary until colour is incorporated.

6. Combine 1/2 of the dry mixture into the egg white mixture. Mix well, there is no need to carefully fold the mixture at this point.

7. Add second 1/2 of the dry ingredients to the bowl and begin your macronnage. Scrape the bottom of the bowl, turn the batter upside down and plop it on the top. Alternate this technique with swiping the batter against the side of the bowl several times and then scraping the side of the bowl and plopping the batter on top. The best way to tell when your batter is ready is by scooping a spoonful of batter and letting it drop back into the bowl. If it slowly drops back into the bowl, lands on the batter in a small mound and slowly sinks back into the batter, then you are done.

8. Transfer the mixture to a piping bag with a plain tip. An 804 (1 cm opening) pastry tip will work best but a plain tip size 10 or higher can also be used. Ensure you turn down the top cuff of the bag before filling. This will make the process of filling the bag a lot less messy.

9. On tray, pipe out 2 cm rounds of batter to make mini macaron. For medium macarons pipe to 3 cm in diameter. Leave 4 cm between piped rounds. Lay a dishcloth on your counter and rap the tray firmly against the counter top a few times. Don't be afraid to really give them a BANG! This will help the macaron's peaks sink in. You may need to rap the tray in between piping rows because the macaron can set within a minute.

11. To decorate place a piece of dried rose petal onto 30 or half of the piped rounds. Alternatively splatter macarons with pink food colouring by dipping a flat bristled paint brush into food colouring and using the end of your finger, hold the bristles back and flick colour onto rounds.

11. Leave trays out at room temperature for 30 minutes to an hour. This will help the feet (pieds) to form.

12. While the macaron are setting, preheat your oven to 300° F (150° C). Reduce the temperature to 250° F (120° C) and bake your macaron in the center of the oven, one tray at a time, for about 15 - 20 minutes. Test after 12 minutes. If you touch the top of the macaron and there is a wobble continue baking for 5 - 6 minutes longer until firm. Remove trays from oven and let cool on trays.

13. Marry up the shells in similar sized pairs, one with a rose petal and one with out. Fill a piping bag or Ziploc bag with the Rose Water Ganache and pipe a small amount into the center of one shell. Place its partner on top, using a circular motion to gently squish filling to but not over the edges of the macaron.

For the Rose Water Ganache

1. Place finely chopped chocolate into a small bowl.

1. In a small pot, bring cream, corn syrup and rose water to a simmer over medium heat, stirring with a spatula.

2. Remove cream from heat and add gel food colouring using 3 parts pink to 1 part ivory, mix until desired colour is reached.

3. Pour cream mixture over chopped chocolate and let sit for 1 minute. Mix until melted and then add in butter and mix until incorporated.

Vanilla Pistachio Cupcakes
Cake recipe adapted from Rose Levy Barenbaum
Pistachio Paste recipe adapted from Pierre Herme

Yield: One 2 layer, 8" round cake or 20-24 cupcake

Notes*
To make the Pistachio filling you will need a digital kitchen scale and a candy thermometer. The Cake Box cake was also used to make these delicious Easter treats.

Ingredients:

For the "Cake Box" Cake
  • 5 large egg whites, at room temperature
  • 1 cup whole milk, at room temperature
  • 2 teaspoons pure vanilla extract
  • 1/2 teaspoon pure almond extract
  • 3 cups cake flour, sifted
  • 1 3/4 cups sugar
  • 1 tablespoon + 1 teaspoon baking powder
  • 3/4 teaspoon salt
  • 6 tablespoons unsalted butter, at room temperature and cut into cubes
  • 6 tablespoons vegetable shortening, at room temperature and cut into cubes
For the Fluffy Mom Frosting
  • 1 1/2 cups + 2 tablespoons butter, at room temperature
  • 3 cups icing sugar, sifted (confectioners', powdered)
  • 2 tablespoons milk
  • 2 teaspoons pure vanilla extract
  • 1/4 teaspoon salt
For the Pistachio Filling
  • 125 grams shelled pistachios, unsalted
  • 30 grams ground almonds
  • 60 grams sugar
  • 1 tablespoon + 1-2 teaspoons water
  • 2 drops almond extract
  • 1/2 cup Fluffy Mom Frosting
Instructions:

For the "Cake Box" Cake

1. Preheat oven to 350° F (180° C). Line muffin pan with cupcake liners.

2. In a 2 cup measuring cup, combine the egg whites, 1/4 cup of milk, vanilla and almond extract and stir with a fork. Set aside.

3. In the bowl of an electric mixer fitted with the paddle attachment combine the flour, sugar, baking powder and salt together on low speed ("stir" on a KitchenAid) for 30 seconds.

4. Add the butter, shortening and remaining milk and mix on low speed until just moistened. Increase to medium speed ("4" on a KitchenAid) for 1 1/2 minutes. Scrape the sides of the bowl and begin to add the egg mixture in 3 separate batches; beat on medium for 20 seconds after each addition.

5. Fill the cupcake liners 3/4 full for a domed peak or 2/3 full for flat tops.
Bake 12-16 minutes until tops feel stable or until a cake tester comes out clean when inserted into the center. Ensure to not over bake these delicate cakes! Check after 12 minutes, but not before, and check in 2 minute intervals until done. Immediately remove cupcakes from muffin pan to cool on racks and let cool completely.

6. Time to fill your cupcake! Using a small pairing knife cut a 3 cm cone out of the top of the cupcake. You want your cone to be fairly deep but not through the bottom of the cake! Fill your cupcake with 1 teaspoon of Pistachio filling. Cut the bottom tip off the cupcake cone and replace the top of the cupcake.

7. Frost with Fluffy Mom Frosting using desired tip and decorate with your Rose Water Macaron, 2 pistachio halves and 3 white dragees. Cover and store at room temperature for up to 2 days or in the refrigerator up to 5 days (eaten at room temperature). Best eaten the same day as baked.

For the Fluffy Mom Frosting

1. In the bowl of an electric mixer fitted with the paddle attachment, whip butter for 8 minutes on medium speed ("4" on a KitchenAid). Butter will become fluffy and pale.

2. Add remaining ingredients and mix on low speed for 1 minute, then on medium-high speed ("6" on a KitchenAid) for 3 minutes. Frosting will be very light, creamy and fluffy.

3. Best used right away.

For the Pistachio Filling

1. In a spice/coffee grinder, grind the pistachios until you reach a fine paste. You might have to do this in batches depending on the size of your grinder. And grind ground almonds in spice/coffee grinder to reduce coarseness. Combine ground nuts in a medium bowl and mix.

2. In a small saucepan mix water with sugar and simmer over medium high heat until mixture reaches 250° F (120° C). Pour the scalding hot sugar over the nuts and quickly mix with a spoon to prevent crystallisation.

3. Once the mixture has cooled slightly begin to knead it with your hands. Carefully add water 1/2 teaspoon at a time until a marzipan-like texture is reached.

4. In a separate bowl mix 2 tablespoons pistachio paste with 1/2 cup Fluffy Mom Frosting.

I hope you tackle these beauties, they are worth it. I will have to try these recipes in cake form, imagine that!

xoxo Melissa

April 22, 2013

OH MON CHERI, I LOVE PARIS! MACARON CUPCAKES

No comments:
Macaron cupcakes via Fine Motor Skills

Bonjour! Last year at this time I was in Paris. Sigh.

I did not have the same level of appreciation for pastry then but I did manage a visit to Laduree and many, many, MANY other less notable but no less delicious patisseries.

Chocolate Macaron via Fine Motor Skills

As I've been absorbing different styles of pastry and decoration it has been hard not to fall in love with French pastry. Ooh la la, it is my new obsession. These cupcakes include little if any traditional French techniques but they are inspired by them.

One of the reasons I love French decoration in particular is because it is all very edible. The chocolate, tuile and spun sugar decorations the French use make my taste buds tingle upon sight. Although I love gumpaste and its amazing versatility I've found the texture can be overwhelming on top of a tiny sweet.

French pastries, like entremet, are often extremely complicated with numerous ingredients and steps but the outcomes are always beautifully refined. These cupcakes are far from masterpieces of refinement however I do love the informality of the cupcake combined with the complexity of the decorations. It keeps the fussiness in check and creates a sense of casualness. And the edible dried flowers add that touch of organic imperfection that I love in any form of design. Okay, I'm hyper-analyzing now. They are just cupcakes for heaven's sake.

Macaron cupcakes via Fine Motor Skills

No, I did not eat all of these cupcakes. They were made for a fundraising bake sale to support the Canadian Cancer Society and this month's Daffodil campaign. Needless to say I jumped at the opportunity to make a ton of cupcakes for a great cause.

Macaron cupcakes via Fine Motor Skills

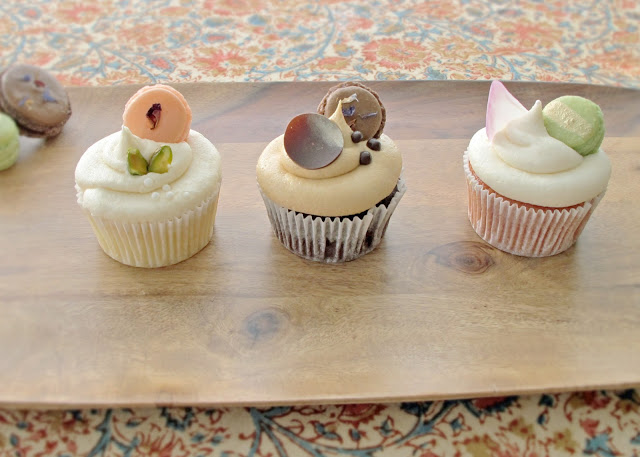
Now for the introductions, starting on the left is the Vanilla Pistachio Cupcake with Rosewater Macaron, center is the Salted Caramel Chocolate Cupcake with Port Wine Macaron and to the right is the Fresh Strawberry and Creamcheese Cupcake with Kusmi Tea Macaron. Because the cupcakes involve three to four different recipes each, I will create separate posts with recipes and tutorials for each one. For now lets just look at some pretty pictures and go into a little more detail.

Vanilla Pistachio Cupcake

The Vanilla Pistachio Cupcake with Rosewater Macaron is made with my favourite Cake-box Cake and Fluffy Mom Frosting recipe and has a pistachio buttercream filling. It is accompanied with a classic french macaron sandwiched with a rosewater-infused white chocolate ganache.

Chocolate Caramel Cupcake via Fine Motor Skills

The Salted Caramel Chocolate Cupcake with Port Wine Macaron was my favourite flavour-wise. It is a decadent chocolate cake with salted caramel filling and is topped with a salted caramel buttercream. The chocolate macaron is sandwiched with a port-infused dark chocolate ganache. It is decorated with a chocolate disc brushed with gold luster dust and Callebaut Crispearls


Strawberry Creamcheese Cupcake via Fine Motor Skills

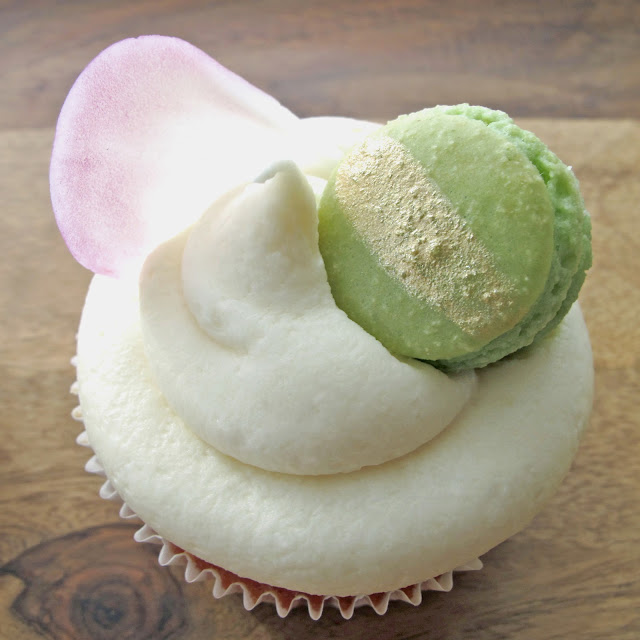
The Fresh Strawberry and Creamcheese Cupcake with Kusmi Tea Macaron is my favourite visually. It is a strawberry cake made with a strawberry reduction for a potent and delicious natural flavour. It is topped with a classic creamcheese buttercream. I decided not to add a filling because I wanted the two main flavours to mingle on their own. The macaron is brushed with gold luster dust and sandwiched with a Kusmi tea-infused white chocolate ganache. It is decorated with a delicate pink dusted, white chocolate petal.

Kusmi Tea via Fine Motor Skills

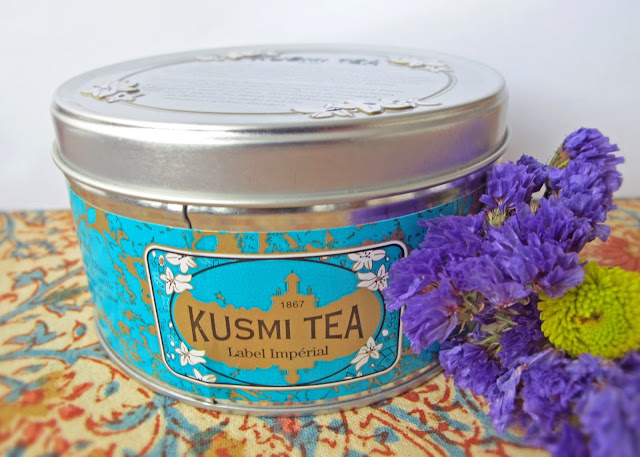
I picked up this Kusmi Tea in Paris but it can be found in many specialty gourmet food retailers around the world. I had not heard of Kusmi tea at the time but I remember I was drawn like a magnet to their delightful storefront in Montmartre. I used the Imperial blend, it is a wonderfully floral and complex green tea.


The making of these cupcakes was a three day, painfully pretty process that was not without its hiccups. Day one was making the pastes, sauces and ganaches (made caramel three times, burned twice), as well as started my egg whites ageing for the macarons. Day two was macaron madness, I'll get into that in the recipe posts. And day three was making the cake, buttercreams and final decorations. Intensive but sooo much fun.

I hope you enjoyed this bit of Parisian inspiration. Recipes will be up soon!

xoxo Melissa

April 17, 2013

THE ODETTE TOP WITH PATTERN

14 comments:
Hey there!

Time to share some sewing. It has been a slow start back into the garment game but I've started off with a bang. This post includes the pattern, hooray! And audio/visual content, whoa!
Odette top with free pattern via fine motor skills

This is the Odette top. She was born because I have been struggling with wearing woven tops. All I ever want to do is wear knits. My current woven tops aren't comfortable enough for me to want to take them off the hanger. They either feel too restricting or are cropped to wear with high-waisted things. Let's not even go there, talk about discomfort. Why in the world do I have so many high-waisted things?

If I'm going to wear a woven its going to need to be roomy. All of my trendy button-ups are too tight, especially across my giant swimming shoulders. I am convinced I got my giant swimming shoulders from my early swimming years, however I am pretty sure they are from my stocky father.
If all I wanted to wear was knits I thought I would start with an inspiration from knits. Odette is sweatshirt-inspired and hits on the rather ubiquitous structured tee trend.

I like simple garments but with a certain extremity to them either in shape, print or texture. The structure of this top is interesting but it's still simple. This simplicity allows for crazy fabric. I LOVE CRAZY FABRIC! I've been especially in love with the double woven quilted fabrics, tapestries and matelasse's on the runways this spring. Hmm, I wish I could link those fabric terms up to designer's garments but I'm a lazy blogger.


I made this top in two different fabrics. A gorgeous metallic matelasse and a finely pleated double-weave.

I actually used the wrong side of the metallic matelasse because the right side had an additional metallic rose pattern and it was way too busy. This fabric looked like it had been in the store since 1994 and that's why I had to have it.

The finely pleated fabric was a good find too. I was worried it would create too much structure in the top but it turned out perfectly. I love this version, it feels a little more sophisticated. You may be able to find a similar fabric in your local store. It looked like current stock at the Fabricana where I purchased it, they carried about 5 different colours too, I may have to go back for more.


When I started this blog I knew I wanted to share some patterns. This may be one way I can gain some readership and frankly, amongst other bloggers, this is one area I have a leg up.

I know pattern drafting and construction techniques. I have a library of design ideas filed away in my brain, all ready to go, and I know what I like. Because this knowledge is second nature it allows creativity to flow through to the design of the garment. I need to exploit this strength because in the realm of pastry design I fall seriously short. Thus far I have been copying and emulating others in the pastry world which feels cruddy. I know it's because I lack the techniques and experience but it is frustrating! However this is what makes pastry so intriguing right now. I have a whole new world of design to discover and hone my taste within. Ah, baking, okay back to sewing.


I haven't used a commercial pattern in years and couldn't remember what the darn things looked like or what kind of info a home sewer would require. So after a bit of online research I discovered the downloadable pattern phenomenon along with a fantastic community of sewers. Burda was where I found this burgeoning society first but then ran across inspiring independent pattern-makers like Victory and Grainline. Mind blown. 


Creating this pattern took forever! It was the formatting and layout that took the longest. I am a sucker for over-analyzing graphic design. Fonts were changed, logo's placed then updated, patterns re-named and due to these changes I had to re-save the PDF's a bajillion times over. On top of that I'm using an ancient software program, Illustrator CS released in 2003, on my 7 year old laptop. My computers new name is officially Crashy McCrash Crash.

Odette top free pattern

Some notes:

> the voluminous structure of this top is not for everyone but I love a volume on top and skinny on bottom silhouette. My next patterns will be easier to wear, promise!

> I work in metric. Most commercial patterns are in imperial and to be honest I kind of use both at different times for different things but all my drafting tools are in good old centimetres.

UPDATE 4/21/13: If the pattern download link didn't work before it should work for you now.

Please download your Odette Pattern here!


Odette top free pattern

Or visit my BurdaStyle profile here. Where I will be uploading patterns.

If anyone makes Odette, has questions, advice or constructive criticism I'd love to hear from you!

And finally please excuse my blurry photoshoot I have a point + shoot camera and my tripod is a stack of books.

When we did photoshoots back at my old job we would often get the models to dance. It loosened up the shoot and I usually loved the end results. So I thought I would try it on my self-conscious self. Here is a musical compilation that took way too long to make but now I finally know how to set pics to music. I enjoy punching when I dance.


xoxo Melissa


April 07, 2013

MEYER LEMON CREAM TART WITH BERRIES

No comments:
Hello! Time to share a new favourite.

Meyer Lemon Tart with Berries

We had a couple friends over for dinner last night and busted out this beauty.

Meyer Lemon Tart with Berries

This dessert is a real people pleaser. The combination of buttery tart, creamy mousse and fresh fruit is the perfect balance to many a meal. We decided to pair it with a Sicilian Lamb Braciolette that Neil (boyfriend) lovingly pounded and prepared. It is a delicious combo of lamb rolled up with copious amounts of fresh mint, rosemary, parsley, prosciutto and pecorino. Yum. The recipe is from the preeminent and highly renowned 'Trail Cooks Italian!' cookbook.

Oh my. This food network link is the exact word for word recipe from the Trail cookbook. Did Mario Batali rip off the Nonnas of Trail?!

Meyer Lemon Tart with Berries

Okay, back to the dessert. I highly recommend using Meyer lemons if you can find them. I've recently seen the wee bags available all over town. They are a hybrid of mandarin and lemon and have the loveliest unique flavour. They are sweet with an amazing perfume and are easy on the tart-o-meter making them ideal for desserts.

Sweet tart dough

May I also highly recommend the rectangular tart pan. I'd been hunting for one for a while and had spotted some at William Sonoma but was not interested in the price. I recently swooped one up at the nearby Home Sense for an $8 steal. Whoop! Imagine this crust all lined up with asparagus. That is the chicest GD asparagus ever.

If you have some pastry leftover after lining your pan why not make yourself a few mini tarts? May no pastry ever go to waste. Amen.


Here are a few pics of our dinner-making day. We often like to hop on the little ferries to cross False Creek to the Granville Island Market


I enjoy these little boats. What girl wouldn't?

Granville Island

Hmm, I didn't take any pictures inside, sorry. I got too overwhelmed picking out daffodils with one hand and stuffing my face with an almond croissant from La Baguette et L'Echalote with the other. The market is a great place to pick up quality meats, breads, cheeses and olivey type things. You can find some harder to find fruits and veggies there, this is where I picked up the physalis (lantern berries), but the general produce is about the same quality as your local grocer but cha-ching!


Its' officially flats weather for me in Vancouver. Rain or shine my feet are looking ballerina ready.

And now onto the show.


Sweet Tart Dough
Recipe adapted from Sarabeth's Bakery

Yield: Two 14" x 4" rectangular tarts, or two 9" round tarts

Notes*
This makes a large batch of dough. I highly recommend you make the full batch divide it in half and freeze one portion for a later delicious date. The dough will keep up to 2 months in the freezer.

Ingredients:
  • 3/4 cup unsalted butter, at cool room temperature, cut into 1/2" cubes
  • 6 tablespoons superfine sugar (berry, caster sugar)
  • 1 large egg plus 1 large egg yolk, beaten
  • 1/2 teaspoon pure vanilla extract
  • 2 1/4 cups all-purpose flour
  • 1/4 teaspoon salt
Directions:

1. Beat the butter in the bowl of a mixer fitted with the paddle attachment on high speed until smooth, about 1 minute.

2. Add the sugar and beat, occasionally scraping down the bowl, until very light in colour and texture, about 3 minutes.

3. Gradually dribble in the eggs and vanilla.

4. Reduce the mixer to low and add the flour and salt. Mix just until the dough clumps together and the sides of the bowl are almost clean.

5. Gather up the dough and transfer to a lightly floured work surface. Knead a few times until smooth and supple. Divide the dough in half. Shape each portion into a rectangle, about 1 inch thick, and wrap each rectangle in plastic wrap. Refrigerate until chilled but not hard, 30 minutes to 1 hour. (The dough can be refrigerated up to 1 day, but it will be very hard, and should stand at room temperature for about 30 minutes before rolling out. The dough can also be frozen double wrapped in plastic wrap for up to 2 months. Defrost in the refrigerator overnight.)

Meyer Lemon Curd
Recipe adapted from Sarabeth's Bakery

Yield: About one cup

Notes*
Use 2 regular lemons if Meyers cannot be found. Feel free to double the recipe, this delectable curd is amazing on scones, toast, yogurt and crepes. Or as a filling for cakes, a lemon meringue tart or just paired with berries.

Ingredients:
  • 3 Meyer lemons
  • 5 egg yolks
  • 1/2 cup plus 1 tablespoon sugar
  • 1/4 cup unsalted butter, at room temperature, cut into 1/2" cubes
Directions:

1. Rinse the lemons under cold water and dry well. Using the small holes on a box grater or a microplane zester, remove the yellow-coloured zest from the lemons, try not to remove the bitter white pith. Cut and squeeze the lemons and strain the juice. You should have about 1/3 cup juice.

2. Place a medium bowl with a fine mesh wire sieve near the stove. In another medium heatproof bowl, whisk the egg yolks, sugar, lemon juice and zest to combine. Place over a saucepan of simmering water, the bowl should not touch the water. Using a silicone spatula, cook the curd, scraping down the sides of the bowl often, until it is opaque and thick enough to cling to the spatula, about 8 minutes. (A finger run through the curd on the spatula should cut a swath, and an instant read thermometer will read 185° C.)

3. Strain the mixture through a wire sieve into a medium bowl. Using the spatula stir the mixture to help it flow through the sieve and gently push the curd through the strainer.

4. Gradually whisk in the butter, allowing each addition to incorporate before adding more.

5. Press a piece of plastic wrap directly onto the curd and pierce a few holes to let steam escape. Let cool at room temperature, transfer to a covered container and refrigerate for up to a week.


Meyer Lemon Cream Tart with Berries
Recipe adapted from Sarabeth's Bakery

Yield: One 14" x 4" rectangular tart or one 9" round tart

Notes*
A tart pan with a removable bottom is preferred but not necessary. You may have a little extra mousse left over from this recipe because I needed to use enough whipping cream to enable it to whip in the bowl of a stand mixer. This dilemma can be solved by making mini tarts from leftover pastry or by just putting it in your mouth.

Ingredients:
  • 1/2 recipe of Sweet Tart Dough
  • 1/2 teaspoon unflavoured gelatin powder
  • 1 tablespoon cold water
  • 1 recipe Meyer Lemon Curd
  • 2 tablespoons mascarpone cheese (optional)
  • 1/2 cup heavy whipping cream, divided
  • 2 1/2 cups mixed berries (I used raspberries, blackberries, strawberries and physalis)
  • 1/2 cup raspberry jam (any variety of berry jam can be used)
  • 1 tablespoon plus 1 teaspoon water, divided
  • 2 tablespoons apricot jam
  • Mint leaves for garnish
Directions:

1. Position rack in the bottom 1/3 of the oven and preheat to 350° F. Place your mixer bowl and whisk attachment in the freezer.

2. On a lightly floured 20" long piece of parchment paper roll out the dough to a 17" x 6 1/2" rectangle. Using the entire length of your arm carefully lift up the dough and flip it onto the tart pan and remove the parchment paper. Carefully ease the dough into the bottom of the pan by lifting up the pastry edge and pressing down into the pan. Try not to stretch the dough. If you have holes and cracks fear not! This dough is very forgiving. Patch up any holes or thinner areas of the crust with a little of the extra overhanging pastry. Pierce the bottom and lower sides of the dough with a fork. Freeze for 10 minutes. Remove from the freezer and using your thumb push down and scrape off the over hanging excess pastry. Freeze for 5 more minutes.

3. Line the dough with a 19" by 8" piece of parchment paper and fill with pastry weights or dried beans. Place the pan on a half-sheet pan. Bake for 15 minutes. Remove from the oven and remove parchment paper and the weights. Continue baking until the pastry is golden brown, 8 to 12 minutes more. Let cool in pan 10 minutes. Transfer to a wire rack and cool completely.

4. Sprinkle the gelatin over the water in a ramekin. Let stand until the gelatin absorbs the water, about 5 minutes. Bring a 1/2" of water to a simmer in a small saucepan. Place the ramekin in the water and stir constantly until the gelatin is completely dissolved, at least 1 minute. Remove the ramekin from the water. Stir 1 tablespoon of the cream into the gelatin.

5. Place the lemon curd and optional mascarpone cheese into a large bowl. Stir to soften the cheese.

6. Whip the remaining cream in a chilled mixer bowl with the whisk attachment at high speed (8 on a Kitchen Aid) until the cream is well thickened but hasn't formed peaks. With the mixer running, pour the gelatin mixture through the whisk so it is quickly and evenly distributed into the cream. Continue beating until the cream forms soft peaks.

7. Stir one-quarter of the whipped cream into the lemon curd mixture to lighten it, then fold in the remaining cream.

8. Carefully spoon the lemon filling into the cooled pastry shell. Fill to 1/8" from the top of the crust and smooth with an offset spatula. Cover with plastic wrap with the wrap barely touching the surface. Refrigerate until chilled and set, at least 1 hour.

9. In a small saucepan combine the berry jam with 1 tablespoon of water. Place over medium heat and gently warm the jam until melted, about 1 minute. Strain the jam to remove seeds and fruit pieces. Remove plastic wrap from tart and spoon strained jam onto set mousse. Cover the entire surface with a thin layer. With the back of a spoon or offset spatula carefully push the jam into the corners and edges of the tart.

10. Cover your tart with berries. I prefer a haphazard look and do not place all the berries perfectly vertical but with some laying at different angles. Place tart in refrigerator.

11. In a small saucepan combine the apricot jam with 1 teaspoon of water. Place over medium heat and gently warm the jam until melted, about 30 seconds. Strain the jam to remove any fruit pieces. Remove tart from fridge and using a pastry brush, brush the jam over the berries. Garnish with mint leaves just before serving. Tart should be served the same day as assembled.

I hope you enjoy this fabulous tart.

xoxo Melissa 
Related Posts Plugin for WordPress, Blogger...